New server: Install & configuration of services (Part III)
- 19 minutes read - 4044 wordsWelcome back, this will be the 3rd part of new server series. In the previous parts I assembled the server and prepared the machine with Ubuntu Server. I configured the basics things like; networking, RAID setup, E-Mail and more. In case you missed that: read Part I and Part II.
Today, we will finish the job with installing and configuring all the services we love so much. Again, I included a Table of Contents for convenience reasons, since it quite a long article. But hopefully the table will help you to navigate around.
The listed services are an important part for my day-to-day programming life and to support open-source & free software in general.
Some of the services can be used by everybody, including yourself.
Expectations
All the services are first explained, hopefully to better comprehend the benefits of each service. Then how-to install the service under Ubuntu Server. Finally, I explain how I configured each service to get the most performance out of it.
Bonus: I also added external links to useful documentation and tools for each service.
The services are listed in random order.
Nginx
![]()
Nginx is a high-performance reverse proxy server and load balancer, which can be used to host web pages or pass the network connection to some internal service running on a particular port.
Install Nginx & Certbot
Public URL: server.melroy.org (= landing page, but Nginx is used for all my domains actually)
sudo apt install -y nginx
sudo usermod -a -G www-data melroy

# Also Installing Let's Encrypt Certbot
sudo apt install -y certbot python3-certbot-nginx

# Generate Secure Diffie–Hellman (DH) key exchange file
cd /etc/nginx
sudo openssl dhparam -dsaparam -out dhparam.pem 4096
Configure Nginx
Assuming you know how-to setup a new Nginx Server block and generate Let’s Encrypt certificates via Certbot (sudo certbot --nginx), we will now look into the Nginx generic configurations.
My /etc/nginx/nginx.conf file:
user www-data;
worker_processes auto;
worker_cpu_affinity auto;
# Change the default thread pool settings
thread_pool default threads=16 max_queue=65536;
# number of file descriptors used for nginx
# the limit for the maximum FDs on the server is usually set by the OS.
worker_rlimit_nofile 65535;
pid /run/nginx.pid;
include /etc/nginx/modules-enabled/*.conf;

events {
	# Determines how much clients will be served per worker
	# max clients = worker_connections * worker_processes
	worker_connections 65535;
	# Optimized to serve many clients with each thread, for linux only
	use epoll;
	# Accept as many connections as possible
	multi_accept on;
}

http {
	##
	# Basic Settings
	##

	# Copies data between one FD and other from within the kernel
	# faster than read() + write()
	sendfile on;
	# Use the default thread pool for asynchronous file I/O
	aio threads;
	# Only use AIO is used for when larger than or equal to this size
	directio 6m;
	# Send headers in one piece, it is better than sending them one by one
	tcp_nopush on;
	# Don't buffer data sent, good for small data bursts in real time
	tcp_nodelay on;
	# For security reasons don't send Nginx version in error messages or response headers
	server_tokens off;
	# Disable logging if a file can't be found
	log_not_found off;
	# Server will close connection after this time
	keepalive_timeout 65;
	# Max size of types hash tables (processing static sets of data. eg. server names, map directives or mime types)
	types_hash_max_size 2048;
	# Max allowed size of the client request body
	client_max_body_size 1G;
	# If the request body size is more than the buffer size, then the entire (or partial)
	# request body is written into a temporary file
	client_body_buffer_size 512k;
	# Request timed out
	client_body_timeout 300s;
	# Allow the server to close connection on non responding client, this will free up memory
	reset_timedout_connection on;

	# Do not turn off request buffering (proxy_buffering), directly pass it to the server without caching
        # See also: https://www.nginx.com/blog/avoiding-top-10-nginx-configuration-mistakes/#proxy_buffering-off
	# Buffer the response from the backend server, which contains the headers.
	proxy_buffer_size 32k;
	# Buffer size of the response to the client while the seponse is not yet fully read
	# proxy_buffer_size + 2x 4k buffers
	proxy_busy_buffers_size 32k;
	# xk = 128 times 16k buffering response (16k for the headers, 496k for the body response)
	proxy_buffers 128 16k;

	include /etc/nginx/mime.types;
	default_type application/octet-stream;

	##
	# SSL Settings
	##
	# Intermediate config
	ssl_protocols TLSv1.2 TLSv1.3;
	ssl_ciphers ECDHE-ECDSA-AES128-GCM-SHA256:ECDHE-RSA-AES128-GCM-SHA256:ECDHE-ECDSA-AES256-GCM-SHA384:ECDHE-RSA-AES256-GCM-SHA384:ECDHE-ECDSA-CHACHA20-POLY1305:ECDHE-RSA-CHACHA20-POLY1305:DHE-RSA-AES128-GCM-SHA256:DHE-RSA-AES256-GCM-SHA384;
	ssl_prefer_server_ciphers off;
	ssl_session_cache shared:SSL:10m;
	ssl_session_timeout 10m;
	ssl_session_tickets off;

	ssl_stapling on;
	ssl_stapling_verify on;
	ssl_ecdh_curve secp521r1:secp384r1:secp256k1;

	resolver 8.8.8.8 8.8.4.4 208.67.222.222 208.67.220.220 valid=60s ipv6=off;
	resolver_timeout 4s;

  ##
  # Rate limiting
  ##
	# Whitelist of rate limit
	geo $limit {
	    default 1;
      127.0.0.1 0;
	    192.168.1.0/24 0;
	}
	map $limit $limit_key {
	    0 "";
	    1 $binary_remote_addr;
	}
	# Two stage rate limit (10 MB zone): 2 requests/sec limit (=second stage)
	limit_req_zone $limit_key zone=ip:10m rate=2r/s;
  # First stage (burst) can be found in the individual virtual server configs

	##
	# Logging Settings
	##
	# Discard 2xx or 3xx responses from logging
        # Fail2Ban rate limit filter still works, because it checks on Nginx error log
	map $status $loggable {
	    ~^[23] 0;
	    default 1;
	}
	log_format timed_combined '$remote_addr - $remote_user [$time_local]  '
		'"$request" $status $body_bytes_sent '
		'"$http_referer" "$http_user_agent" "$host" $request_time';

	access_log /var/log/nginx/access.log timed_combined if=$loggable;
	# Show warn, error, crit, alert and emerg messages
	error_log /var/log/nginx/error.log warn;

	##
	# Gzip Settings
	# Reduce the data that needs to be sent over network
	##
	gzip            on;
	gzip_disable    msie6;

	gzip_vary       on;
	gzip_comp_level 3;
	gzip_min_length 256;
	gzip_buffers    16 8k;
	gzip_proxied    any;
	gzip_types
		text/css
		text/plain
		text/javascript
		text/cache-manifest
		text/vcard
		text/vnd.rim.location.xloc
		text/vtt
		text/x-component
		text/x-cross-domain-policy
		application/javascript
		application/json
		application/x-javascript
		application/ld+json
		application/xml
		application/xml+rss
		application/xhtml+xml
		application/x-font-ttf
		application/x-font-opentype
		application/vnd.ms-fontobject
		application/manifest+json
		application/rss+xml
		application/atom_xml
		application/vnd.geo+json
		application/x-web-app-manifest+json
		image/svg+xml
		image/x-icon
		image/bmp
		font/opentype;

	##
	# Virtual Host Configs
	##

	include /etc/nginx/conf.d/*.conf;
	include /etc/nginx/sites-enabled/*;
}
Next to that, I created some general snippets that I can easily be reused and included into the server blocks.
Like /etc/nginx/snippets/fastcgi-php.conf:
# regex to split $uri to $fastcgi_script_name and $fastcgi_path
fastcgi_split_path_info ^(.+?\.php)(/.*)$;
set $path_info $fastcgi_path_info;

# Check that the PHP script exists before passing it
try_files $fastcgi_script_name =404;

include fastcgi.conf;

## fastcgi settings
# Set PHP handler
fastcgi_pass unix:/run/php/php8.1-fpm.sock;
fastcgi_index index.php;
# Increase timeout
fastcgi_read_timeout 600;
fastcgi_intercept_errors on;
# Disable buffering (for uploading files)
fastcgi_request_buffering off;

# Increase memory size of the buffer segments (used for the payload of the response)
# 32 x 16k
fastcgi_buffers 32 16K;
# Increase memory buffer for HTTP response header
fastcgi_buffer_size 32k;

# fastcgi params
fastcgi_param SCRIPT_FILENAME $document_root$fastcgi_script_name;
fastcgi_param PATH_INFO $path_info;
fastcgi_param HTTPS on;
fastcgi_param modHeadersAvailable true;         # Avoid sending the security headers twice
fastcgi_param front_controller_active true;     # Enable pretty urls
And /etc/nginx/snippets/security.conf:
# Increase security (using the Diffie-Hellman Group file)
ssl_dhparam /etc/nginx/dhparam.pem;

# Don't leak powered-by
fastcgi_hide_header X-Powered-By;

# Security headers
# Don't allow the browser to render the page inside an frame or iframe and avoid clickjacking
add_header X-Frame-Options "SAMEORIGIN" always;
# Enable the Cross-site scripting (XSS) filter built into most recent web browsers.
add_header X-XSS-Protection "1; mode=block" always;
# When serving user-supplied content, include a X-Content-Type-Options: nosniff header along with the Content-Type: header,
# to disable content-type sniffing on some browsers.
add_header X-Content-Type-Options "nosniff" always;
# Referrer Policy will allow a site to control the value of the referer header in links away from their pages.
add_header Referrer-Policy "no-referrer" always;
# Disable the option to open a file directly on download
add_header X-Download-Options "noopen" always;
# Don't allow cross domain of Flash & PDF documents
add_header X-Permitted-Cross-Domain-Policies "none" always;
#  Feature to support on your site and strengthens your implementation of TLS by getting the User Agent to enforce the use of HTTPS
add_header Strict-Transport-Security "max-age=31536000; includeSubDomains; preload" always;

# Restore IP behind proxy
real_ip_header X-Real-IP; ## X-Real-IP or X-Forwarded-For or proxy_protocol
real_ip_recursive off;    ## If you enable 'on'
And finally, /etc/nginx/snippets/general.conf:
location = /robots.txt {
    allow all;
    log_not_found off;
    access_log    off;
}

location = /favicon.ico {
    log_not_found off;
    access_log off;
}

# assets, media
location ~* \.(?:css(\.map)?|js(\.map)?|jpe?g|png|gif|ico|cur|heic|webp|tiff?|mp3|m4a|aac|ogg|midi?|wav|mp4|mov|webm|mpe?g|avi|ogv|flv|wmv)$ {
    expires    18d;
    add_header Access-Control-Allow-Origin "*";
    add_header Cache-Control "public, no-transform";
    access_log off;
}

# svg, fonts
location ~* \.(?:svgz?|ttf|ttc|otf|eot|woff2?)$ {
    expires    18d;
    add_header Access-Control-Allow-Origin "*";
    add_header Cache-Control "public, no-transform";
    access_log off;
}

# Do not allow any hidden files or folders (including .htaccess or .env files and .git folder)
# Return 444, do not spent even resources
location ~ /\. {
  deny all;
  return 404;
  access_log off;
}
Example usage of such snippets in a Nginx server block example:
server {
    listen 80;
    server_name yourhomesite.com;
    # Redirect to HTTPS
    if ($host = yourhomesite.com) {
      return 301 https://$host$request_uri;
    }
}

server {
    listen 443 ssl http2;
    server_name yourhomesite.com;

    root /var/www/html;
    index index.html index.php;

    # Allow up to burst 80 requests, first 50 are processed without delay.
    # After 50 excessive requests we enforce our 2 r/s zone limit. After 80 excessive requests (burst) we reject the requests.
    limit_req zone=ip burst=80 delay=50;

    ssl_certificate /etc/letsencrypt/live/yourhomesite.com/fullchain.pem;
    ssl_certificate_key /etc/letsencrypt/live/yourhomesite.com/privkey.pem;
    include snippets/security.conf;

    location / {
        add_header 'Access-Control-Allow-Origin' '*';
        try_files $uri $uri/ =404;
    }
    location ~ \.php(?:$|/) {
        include snippets/fastcgi-php.conf;
    }

    include snippets/general.conf;
}
Update: Nginx server section also include a rate limiting configuration (limit_req).
Read more: Nginx Docs, Mozilla SSL Configuration Tool and SSL Labs Server Tester.
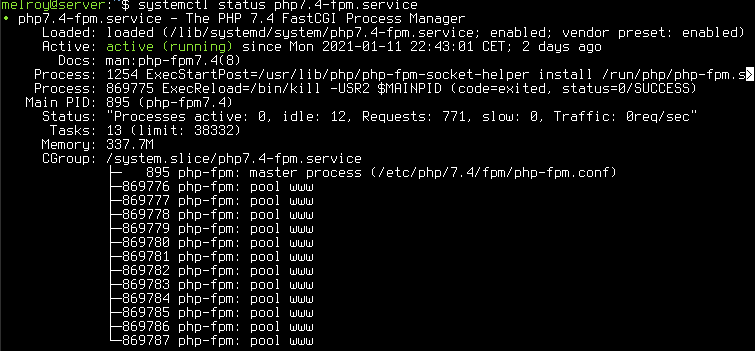
PHP FPM
Since we are using Nginx, we will use the PHP FPM (FastCGI Process Manager) together with Nginx for PHP scripts.
Install PHP-FPM + Modules
Important: It’s now (in the year 2023) advised to upgrade to php8.1.
sudo apt install -y \
  php-apcu php-apcu-bc php-cg php-common php-igbinary php-imagick \
  php-msgpack php-redis php7.4-bcmath php7.4-bz2 php7.4-cgi \
  php7.4-cli php7.4-common php7.4-curl php7.4-fpm php7.4-gd \
  php7.4-gmp php7.4-intl php7.4-json php7.4-mbstring \
  php7.4-mysql php7.4-opcache php7.4-readline \
  php7.4-xml php7.4-zip
Configure PHP & PHP-FPM
I will discuss the most import changes I did.
Changes to /etc/php/7.4/fpm/pool.d/www.conf:
pm = dynamic
pm.max_children = 120
pm.start_servers = 20
pm.min_spare_servers = 10
pm.max_spare_servers = 60
clear_env = no
# Uncommenting all env lines in www.conf
Changes to /etc/php/7.4/fpm/php.ini:
[PHP]
output_buffering = 0
max_execution_time = 900
max_input_time = 900
max_input_vars = 5800
memory_limit = 1G
display_errors = Off
log_errors = Off
post_max_size = 15G
upload_max_filesize = 15G
max_file_uploads = 200

[opcache]
opcache.enable=1
opcache.memory_consumption=512
opcache.interned_strings_buffer=128
opcache.max_accelerated_files=50000
opcache.validate_timestamps=1
opcache.revalidate_freq=120
opcache.save_comments=1
Update: Added opcache configs.
Restart the PHP FPM service to apply the changes: sudo systemctl restart php7.4-fpm
Read more: PHP-FPM docs, php.ini docs
Monit
Monit will be used to monitor the running services, report issues to me and automatically (re)starts if something goes wrong.
Install monit: sudo apt install monit
Public URL: monit.melroy.org (does require login too bad)
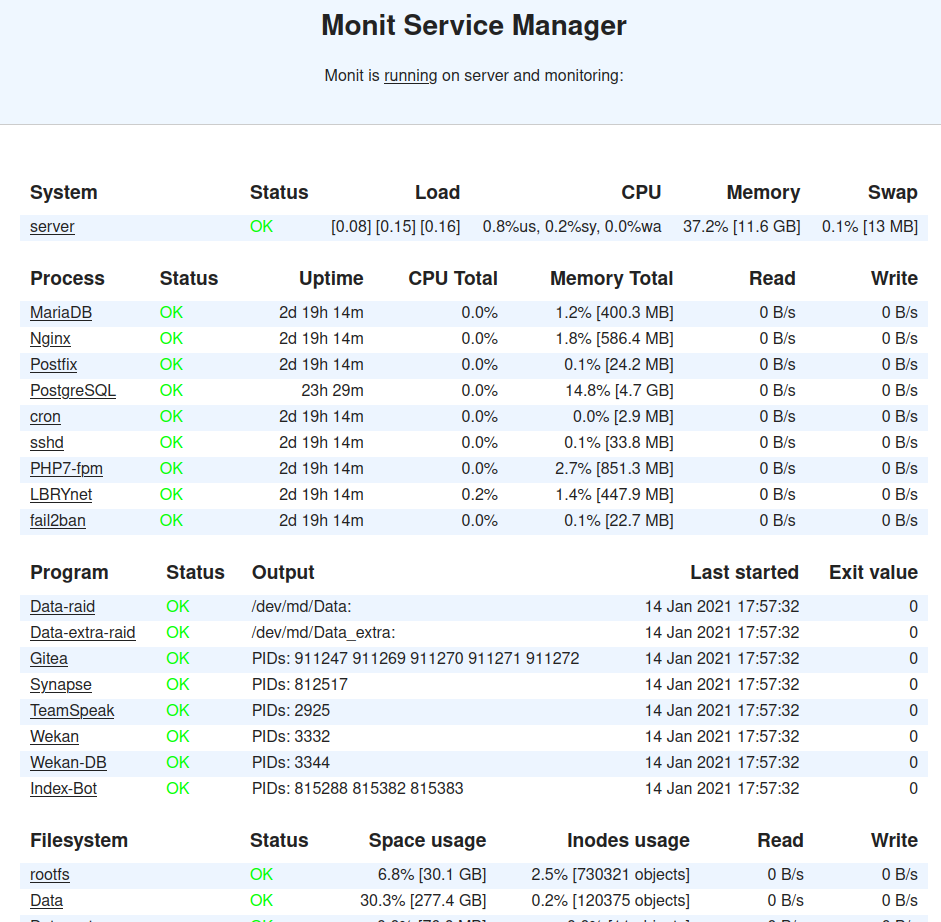
Configure Monit
Be sure you also configure the set mailserver and set alert <your_email>, in order to receive e-mail notifications.
Some other highlights from the /etc/monit/monitrc file:
# Enable the dashboard webpage, seen above
set httpd port 2812 and
    use address localhost
    allow admin:secret_password

# Check CPU & memory usage
check system $HOST
   if loadavg (1min) per core > 2 for 5 cycles then alert
   if loadavg (5min) per core > 1.5 for 10 cycles then alert
   if cpu usage > 90% for 10 cycles then alert
   if cpu usage (wait) > 20% then alert
   if memory usage > 75% then alert
   if swap usage > 17% then alert

check filesystem rootfs with path /
  if space usage > 80% then alert
  group server

check filesystem Data with path /media/Data
  if space usage > 80% then alert
  group server

check filesystem Data_extra with path /media/Data_extra
  if space usage > 80% then alert
  group server

# Check RAID healthy
check program Data-raid with path "/sbin/mdadm --misc --detail --test /dev/md/Data"
  if status != 0 then alert

check program Data-extra-raid with path "/sbin/mdadm --misc --detail --test /dev/md/Data_extra"
  if status != 0 then alert

# Some services as an example
check process Nginx with pidfile /run/nginx.pid
   group www-data
   start program = "/bin/systemctl start nginx"
   stop program  = "/bin/systemctl stop nginx"
   if failed host 127.0.0.1 port 443 protocol https for 3 cycles then restart
   if 3 restarts within 5 cycles then unmonitor

check process sshd with pidfile /var/run/sshd.pid
   start program "/bin/systemctl start ssh"
   stop program "/bin/systemctl stop ssh"
   if failed port 22 protocol ssh then restart
   if 3 restarts within 5 cycles then unmonitor

# Ping test
check host google.com with address google.com
  if failed ping then alert

# Check network
check network public with interface enp45s0
   start program  = "/usr/sbin/ip link set dev enp45s0 up"
   stop program  = "/usr/sbin/ip link set dev enp45s0 down"
   if failed link then restart
   if failed link then alert
   if changed link then alert
   if saturation > 90% then alert
   if download > 40 MB/s then alert
   if total upload > 3 GB in last 2 hours then alert
   if total upload > 10 GB in last day then alert
Docker & Docker compose

Containerization is becoming quite popular, especially since Docker. It is must faster and lighter than running VMs (Virtual Machines), but with similar benefits. Like consistent environment and runs in isolation.
Docker allows you to run containers, be it from your own created image or images which are made publicly available for you to use.
Install Docker / Docker Compose
Installation of Docker & Docker Compose was actually already explained in Part 2.
So if you want to install Docker or Docker compose, please follow the guide in the link above!
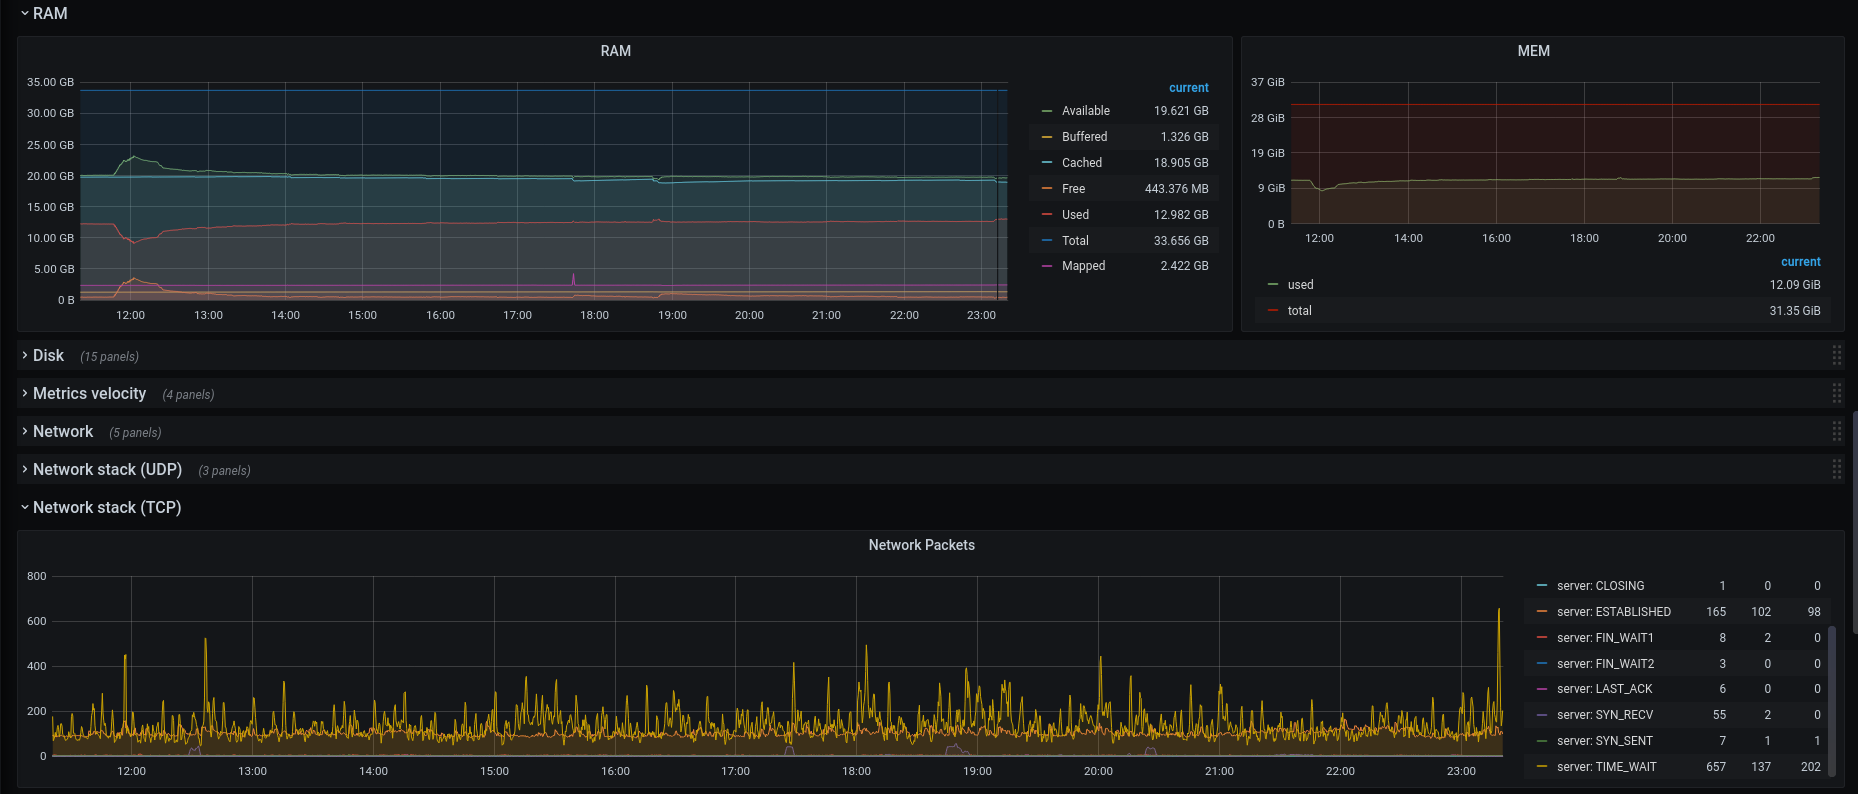
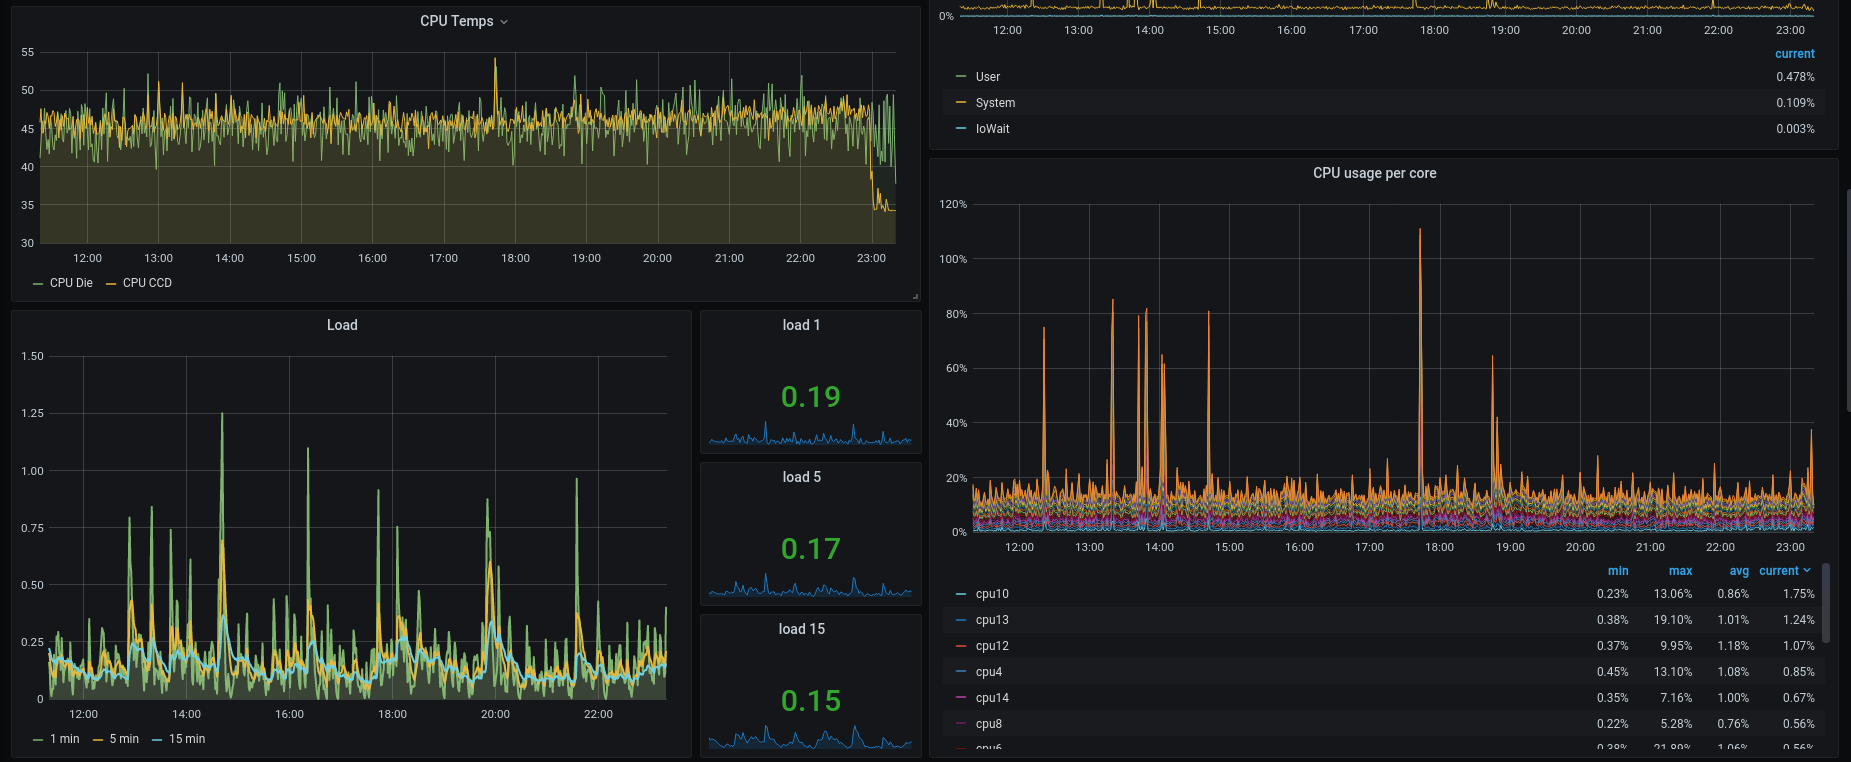
Grafana, InfluxDB & Telegraf
Grafana is a dashboard tool, for displaying graphs and such. InfluxDB is a time-series database. Telegraf is the collecting tool, collecting stats from your computer, which will log the data into InfluxDB. Within Grafana, I configure to use InfluxDB as data-source. Then I configure in Grafana the graph to query the data from the database, eventually showing the information on the dashboard in Grafana.
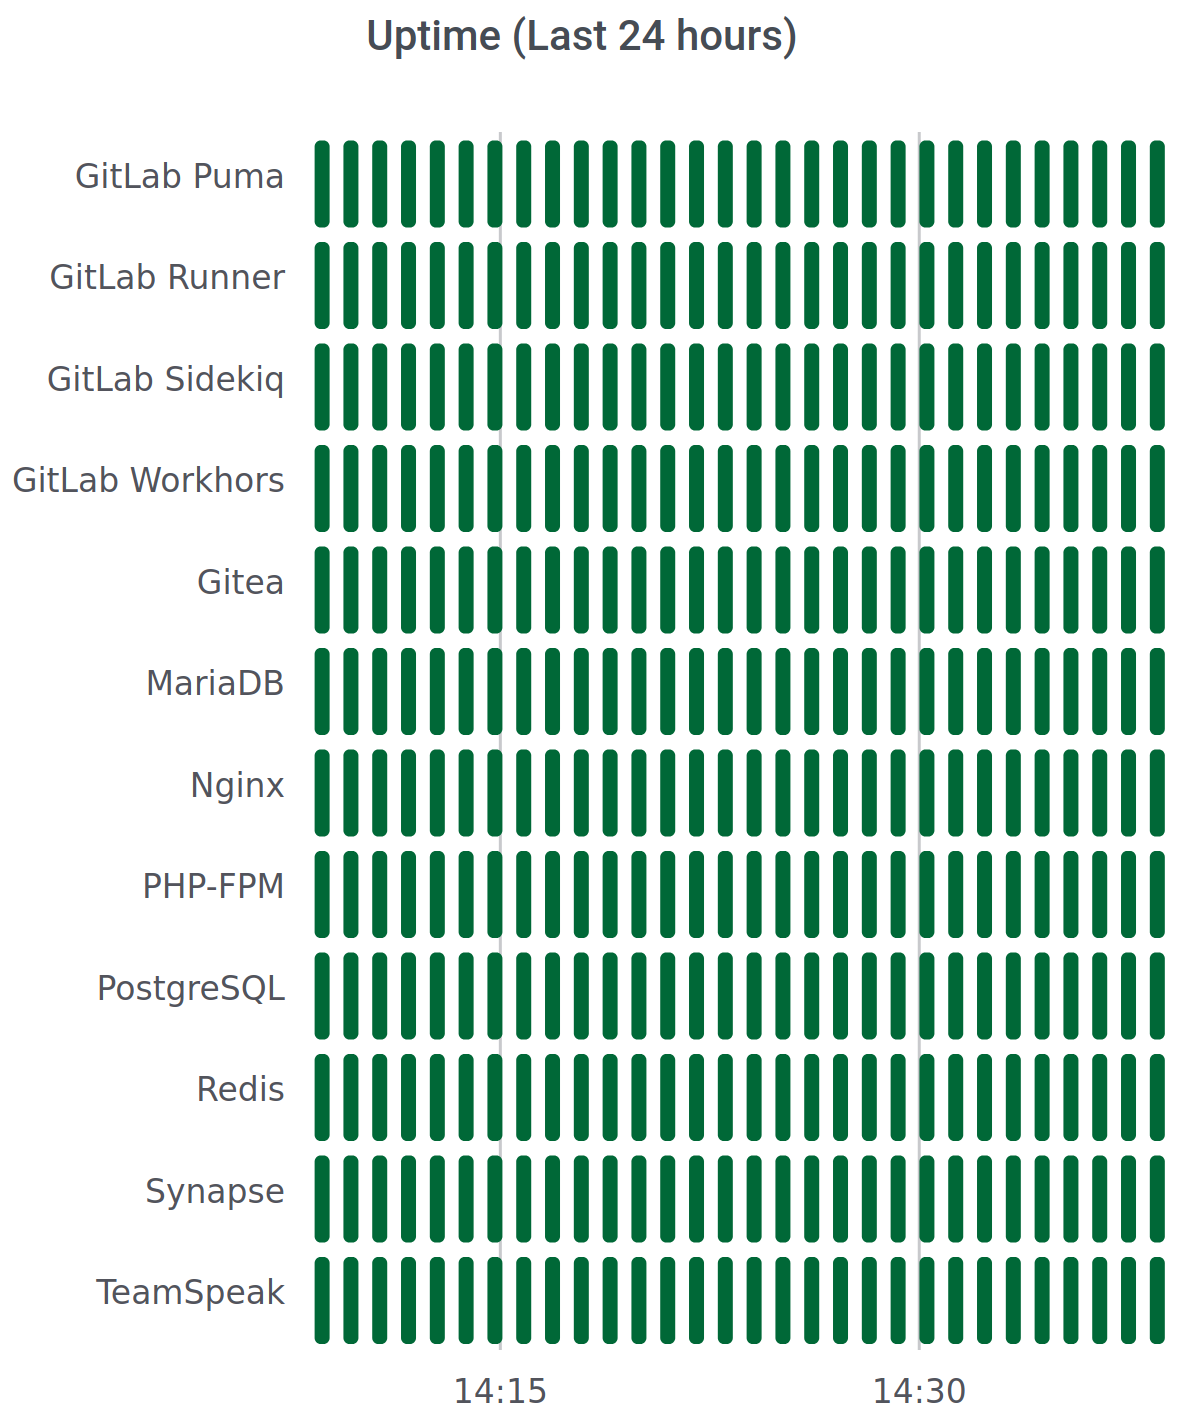
Public URL: stats.melroy.org (check-out my public status page!)
Install Grafana
echo "deb https://packages.grafana.com/oss/deb stable main" | sudo tee -a /etc/apt/sources.list.d/grafana.list
sudo apt update
sudo apt install -y grafana
sudo systemctl daemon-reload
sudo systemctl enable grafana-server
sudo systemctl start grafana-server

# InfluxDB
wget -qO- https://repos.influxdata.com/influxdb.key | sudo apt-key add -
source /etc/lsb-release
echo "deb https://repos.influxdata.com/${DISTRIB_ID,,} ${DISTRIB_CODENAME} stable" | sudo tee /etc/apt/sources.list.d/influxdb.list
sudo systemctl unmask influxdb.service
sudo systemctl start influxdb

# Telegraf
sudo apt install telegraf

# Install Additional plugin in Grafana
sudo grafana-cli plugins install yesoreyeram-boomtable-panel
sudo grafana-cli plugins install flant-statusmap-panel
sudo chown grafana.grafana -R /var/lib/grafana/plugins/
sudo systemctl restart grafana-server
Configure Grafana/InfluxDB/Telegraf
In Telegraf I configured quite some inputs to collect data from, some highlights from the /etc/telegram/telegraf.conf file:
[agent]
  interval = "20s"
  round_interval = true
  metric_batch_size = 5000
  metric_buffer_limit = 10000
  collection_jitter = "5s"

# Output the data into InfluxDB
[[outputs.influxdb]]
  urls = ["http://127.0.0.1:8086"]

# Inputs
[[inputs.cpu]]
  percpu = true
  totalcpu = true
  collect_cpu_time = false
  report_active = false

[[inputs.disk]]
  ignore_fs = ["tmpfs", "devtmpfs", "devfs", "iso9660", "overlay", "aufs", "squashfs"]

[[inputs.diskio]]
[[inputs.kernel]]
[[inputs.mem]]
[[inputs.processes]]
[[inputs.swap]]
[[inputs.system]]
[[inputs.hddtemp]]
[[inputs.interrupts]]
[[inputs.kernel_vmstat]]
[[inputs.linux_sysctl_fs]]
[[inputs.net]]
[[inputs.net_response]]
  protocol = "tcp"
  address = "localhost:80"

[[inputs.netstat]]
[[inputs.procstat]]
  pid_file = "/var/run/nginx.pid"

[[inputs.sysstat]]
  sadc_path = "/usr/lib/sysstat/sadc"

[[inputs.systemd_units]]
[[inputs.temp]]
Important: Only log want you really need! The Telegraf configuration above is most likely too much for you.
Telegraf data is stored in InfluxDB, I use Grafana to create graphs out of the data:

Read more: Grafana: Getting Started, Telegraf: Getting Started
GitLab & GitLab Runner
GitLab is an open-source and very powerful Git hosting tool, issue tracking, time tracking, Agile/KanBan tool as well as CI/CD (Continuous Integration, Continuous Deployment) tool. Works great together with their GitLab runner to support CI/CD.
Public URL: gitlab.melroy.org

Install GitLab
sudo apt install -y curl openssh-server ca-certificates tzdata
curl https://packages.gitlab.com/install/repositories/gitlab/gitlab-ce/script.deb.sh | sudo bash
sudo EXTERNAL_URL="https://gitlab.melroy.org" apt install gitlab-ce

# Runner
curl -L "https://packages.gitlab.com/install/repositories/runner/gitlab-runner/script.deb.sh" | sudo bash
sudo -E apt install gitlab-runner

# Register runner
sudo gitlab-runner register
Configure GitLab/ GitLab-Runner
Most important settings in the /etc/gitlab/gitlab.rb file:
external_url 'https://yourdomain.com'
# Store git data at another location
git_data_dirs({
  "default" => {
    "path" => "/media/Data/gitlab/git-data"
   }
})
sidekiq['max_concurrency'] = 25
sidekiq['min_concurrency'] = 15

# Since I already have Nginx running, I disabled the built-in
nginx['enable'] = false
Read more: GitLab Docs (great documentation!), GitLab Runner Docs
Tor
![]()
Tor can be a bit overwhelming to understand. Actually the Tor package can be configured to be used as just a Client, as Relay or as a so called Hidden Service. Or both, but that is not advised (particularly a Relay & Hidden service isn’t advised together).
Anyway, for the people who are new to Tor. Tor is a anonymous communication network, which routes the traffic through a set of relays. With the goal to be anonymous as a client user.
Being anonymous on the Internet means you can use the Onion services, but be-aware of the fact you may leak information to Tor services. Like your usernames, passwords or maybe your actual name. In the end the users, are often the ones who leaks data about themselves, causing to loss their anonymity. Meaning you can’t blame Tor for that.
Relay & Hidden Services
On your PC, you’ll most likely only use the client of Tor, like the official Tor Browser. On a dedicated servers on the other hand, Tor is often used as either a Relay node or Hidden Service.
Disclaimer: Of-course, technologies like Tor can be used for both ‘good’ and ‘bad’ (depending on who you ask). The same can be said about every decentralized or anonymous technology for that matter.
With a Relay node you help the Tor network to become more decentralized, faster and more secure. Helping people in world that are being censored. You can also host a Bridge node, which will allow users in countries where Tor is blocked still be able to use Tor. There are some public metrics available: Nr. of Tor nodes, different relays. And Relay Search tool.
Hidden Services are the (web) services that are run in the Tor network, which are reachable by an .onion domain. And by default not available on the clearnet.
Important: *It does require a Tor Browser to visit onion links.
Just to name two onion domains, DuckDuckGo: http://3g2upl4pq6kufc4m.onion/ and The Hidden Wiki: http://zqktlwiuavvvqqt4ybvgvi7tyo4hjl5xgfuvpdf6otjiycgwqbym2qad.onion/wiki/index.php/Main_Page. Yet again, you can host your own hidden service in the Tor network.
Install Tor
sudo apt install -y apt-transport-https
sudo nano /etc/apt/sources.list.d/tor.list # See content below
sudo apt update
sudo apt install tor deb.torproject.org-keyring
tor.list with content:
deb https://deb.torproject.org/torproject.org focal main
deb-src https://deb.torproject.org/torproject.org focal main
Configure Tor
Let’s say you want to run a Onion hidden service. The configuration file /etc/tor/torrc will look like:
# Disable outgoing
SocksPort 0

# Configure Hidden Service
HiddenServiceDir /var/lib/tor/hidden_service/
HiddenServiceVersion 3
HiddenServicePort 80 127.0.0.1:3000
This will put a local running service running on port 3000 available via Tor Onion service on port 80. Restart tor service: sudo systemctl restart tor. sudo cat /var/lib/tor/hidden_service/hostname should give you the onion domain.
Read more: Tor Support site, Relay Operators and Onion services.
DuckDNS
My home internet connection has a dynamic IP address assigned, although it doesn’t change often. However, if my external IP does change, that should not impact my services availability. Therefore I use DuckDNS to periodically check my IP address, and update when needed. My DNS records will therefore always point to the correct IP address.
Install DuckDNS
mkdir duckdns
cd duckdns
nano duck.sh # With content see below
chmod +x duck.sh
duck.sh should contain:
#!/bin/bash
echo url="https://www.duckdns.org/update?domains=melroyserver&token=secret_token&ip=" | curl -k -o ~/duckdns/duck.log -K -
# Don't forget to change the secret_token to your token
Add the duck.sh script to crontab:
crontab -e
*/5 * * * * ~/duckdns/duck.sh >/dev/null 2>&1
Let’s try nslookup:
nslookup melroyserver.duckdns.org
Server:		127.0.0.53
Address:	127.0.0.53#53

Non-authoritative answer:
Name:	melroyserver.duckdns.org
Address: x.xxx.xx.xxx
Read more: Duck DNS: Spec
Python3
sudo apt install -y python3 python3-setuptools python-is-python3
sudo apt-mark hold python2 python2-minimal python2.7 python2.7-minimal libpython2-stdlib libpython2.7-minimal libpython2.7-stdlib
Fail2Ban
sudo apt install -y fail2ban
sudo systemctl start fail2ban
sudo systemctl enable fail2ban
NodeJS
curl -sL https://deb.nodesource.com/setup_lts.x | sudo -E bash -
sudo apt install -y nodejs
sudo apt install gcc g++ make
echo "deb https://dl.yarnpkg.com/debian/ stable main" | sudo tee /etc/apt/sources.list.d/yarn.list
sudo apt update
sudo apt install -y yarn
Databases
MariaDB
MariaDB is a database open-source replacement of the previously known MySQL server. Installing is easy: sudo apt install mariadb-server
Public URL https://mysql.melroy.org (actually a web-based frontend, login required too bad)
Read more: MariaDB Docs
PostgreSQL
Just another database, which is sometimes faster with complex queries than MySQL. Some application prefer to run in PostgreSQL databases.
Installation is just as easy as MariaDB: sudo apt install postgresql
Configure PostgreSQL
Important: It’s now (the year is 2023) advised to upgrade to PostgreSQL v14 or v15.
Changes to /etc/postgresql/12/main/postgresql.conf file (optimized for lot of read/write and SSD):
max_connections = 300
shared_buffers = 8GB
work_mem = 2MB
maintenance_work_mem = 1GB
effective_io_concurrency = 200
dynamic_shared_memory_type = posix
max_worker_processes = 16
max_parallel_workers_per_gather = 4
max_parallel_maintenance_workers = 4
max_parallel_workers = 16
wal_buffers = 16MB
max_wal_size = 8GB
min_wal_size = 1GB
# Decrease to 1.1 when on SSD
random_page_cost = 1.1
# effective_cache_size = 0.5 * RAM
effective_cache_size = 16GB
Read more: PostgreSQL Docs and a very useful PGTune tool.
Redis
Redis is a special database. Redis a in memory database, to cache most used data to speed-up the application/website.
Installation is easy again: sudo apt install redis-server
Add redis group to www-data user: sudo usermod -a -G redis www-data
Configure Redis
Default configuration file /etc/redis/redis.conf:
# Only accept connections via socket file
port 0
unixsocket /var/run/redis/redis-server.sock
unixsocketperm 775
daemonize yes
pidfile /var/run/redis/redis-server.pid
Docker Containers
In theory all services above can be hosted as a docker container. However, the big and heavy services/databases I will run outside of Docker.
For those applications I prefer to run them on true bare-metal server. Services below are currently hosted via Docker in my case:
Synapse

Matrix a fully decentralized, open standard real-time communication protocol. Synapse is one of the servers for Matrix. Dendrite would be the next-generation server of Matrix.
As a client user, you can use Element for your chats. It’s fully free. Matrix a better alternative for WhatApps, Signal and Telegram. In other words, Matrix is not depending on centralized servers. And therefore Matrix is federated. I will most likely spend a dedicated blog article about Matrix.
Public URL https://matrix.melroy.org (can be used as your Matrix homeserver address!)
Synapse Compose
Since I’m using the PostgreSQL database on my bare metal machine (now I’m using a VM), therefore NOT running another database instance in Docker. Instead I will map the PostgreSQL socket inside the Docker context of the container:
version: "3.3"
services:
  synapse:
    image: matrixdotorg/synapse
    restart: always
    environment:
      SYNAPSE_CONFIG_DIR: /data
      SYNAPSE_CONFIG_PATH: /data/homeserver.yaml
    container_name: synapse
    user: 1000:1000
    healthcheck:
      test: ["CMD-SHELL", "curl -fSs http://localhost:8008/health || exit 1"]
      start_period: "5s"
      interval: "30s"
      timeout: "5s"
      retries: 2
    volumes:
      - /media/data/synapse:/data
      - /var/run/postgresql/.s.PGSQL.5432:/var/run/postgresql/.s.PGSQL.5432
    ports:
      - "127.0.0.1:8008:8008"
    extra_hosts:
      - "host.docker.internal:host-gateway"
Update: Update Docker compose with extra host and mapping the Postgresql socket file.
Main configuration file /media/Data/synapse/homeserver.yaml:
server_name: "melroy.org"
public_baseurl: https://matrix.melroy.org/
listeners:
  - port: 8008
    tls: false
    bind_addresses: ["127.0.0.1"]
    type: http
    x_forwarded: true

    resources:
      - names: [client, federation]
        compress: false

tls_fingerprints:
  [
    { "sha256": "znOrbGUV3jhjIVQw1tMJRWB0MKoR9CX8+HBTiPaM2qM" },
    { "sha256": "47DEQpj8HBSa+/TImW+5JCeuQeRkm5NMpJWZG3hSuFU" },
  ]

caches:
  global_factor: 1.0

database:
  name: psycopg2
  args:
    user: synapse
    password: secret_pass
    database: synapse
    host: 127.0.0.1
    port: 5432
    cp_min: 5
    cp_max: 10

max_upload_size: 10M
enable_registration: true
auto_join_rooms:
  - "#welcome:melroy.org"
report_stats: false
limit_remote_rooms:
  enabled: true
  complexity: 0.7
  complexity_error: "This room is too complex to join. Ask @melroy:melroy.org if you want to change this behaviour."
Gitea

Gitea is a lightweight alternative for GitLab.
Gitea Compose
Also Gitea is using the PostgreSQL database on the bare metal server.
version: "3"
services:
  gitea:
    image: gitea/gitea:latest-rootless
    container_name: gitea
    restart: always
    networks:
      - gitea_external_network
    environment:
      - ROOT_URL=https://yourdomain.com
      - SSH_PORT=22
      - DB_TYPE=postgres
      - DB_HOST=/var/run/postgresql/
      - DB_NAME=giteadb
      - DB_USER=gitea
      - DB_PASSWD=secret
    volumes:
      - /media/data/gitea/data:/var/lib/gitea
      - /media/data/gitea/config:/etc/gitea
      - /etc/timezone:/etc/timezone:ro
      - /etc/localtime:/etc/localtime:ro
      - /var/run/postgresql/.s.PGSQL.5432:/var/run/postgresql/.s.PGSQL.5432
    ports:
      - "127.0.0.1:3000:3000"
      - "127.0.0.1:2222:22"

networks:
  gitea_external_network:
Update: Using Docker rootless image of Gitea.
Wekan
Wekan is a to-do web application, very powerful to keep yourself organized.
Public URL https://todo.melroy.org
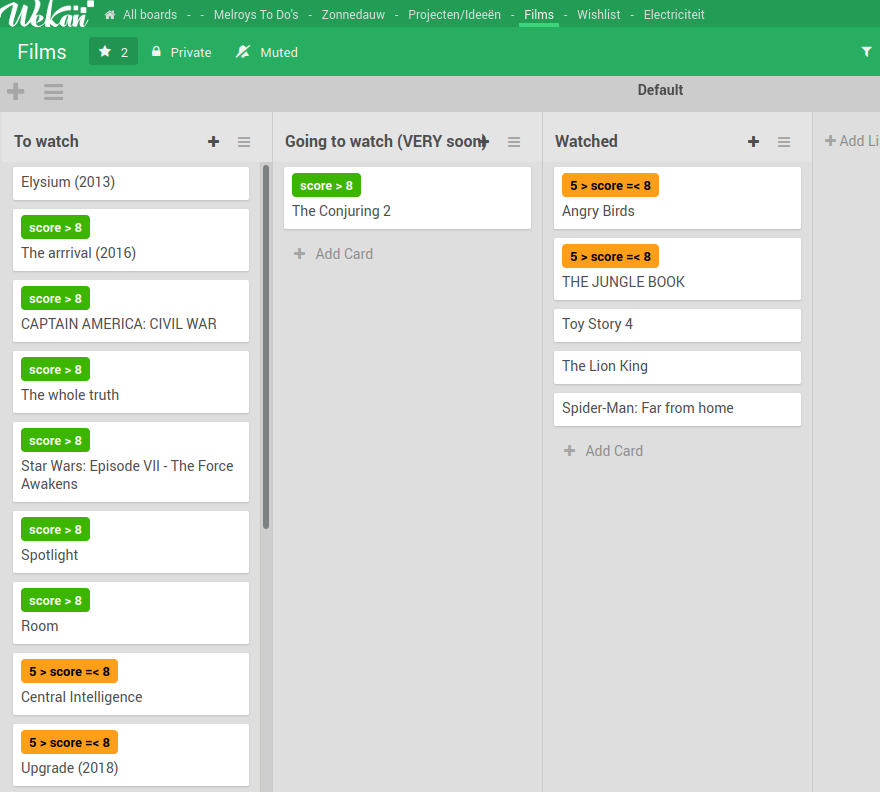
Wekan Compose
For Wekan I will use a Docker MongoDB instance as database storage.
version: "3"
services:
  wekan:
    image: quay.io/wekan/wekan:latest
    container_name: wekan-app
    restart: always
    user: 1000:1000
    networks:
      - wekan-tier
    environment:
      - MONGO_URL=mongodb://wekandb:27017/wekan
      - ROOT_URL=https://yourdomain.com
      - MAIL_FROM=noreply@melroy.org
      - WITH_API=true
      - BROWSER_POLICY_ENABLED=true
      - WRITABLE_PATH=/data
    ports:
      - "127.0.0.1:8185:8080"
    depends_on:
      - wekandb
    volumes:
      - /etc/localtime:/etc/localtime:ro
      - /media/data/wekan/data_files:/data:rw

  wekandb:
    image: mongo:6
    user: 1000:1000
    container_name: wekan-db
    restart: always
    command: mongod --logpath /dev/null --oplogSize 128 --quiet
    networks:
      - wekan-tier
    expose:
      - 27017
    volumes:
      - /etc/localtime:/etc/localtime:ro
      - /etc/timezone:/etc/timezone:ro
      - /media/data/wekan/db:/data/db
      - /media/data/wekan/dump:/dump

networks:
  wekan-tier:
    driver: bridge
Mumble
version: "3.3"

services:
  mumble:
    image: phlak/mumble
    restart: always
    container_name: mumble
    environment:
      - TZ=Europe/Amsterdam
    networks:
      - mumble_external_network
    volumes:
      - /media/data/mumble:/etc/mumble
    ports:
      - "64738:64738"
      - "64738:64738/udp"

networks:
  mumble_external_network:
Public Address: server.melroy.org (default Mumble port)